By RhinoTuning | 23 January 2026 | 0 Comments
How To Convert Your Trailer Wheel Center Cap to Floating Push Through Center Cap?
The most captivating aspect of the "floating push through center cap" design lies in its ability to break away from the "dynamic blur" sensation of traditional wheel center cap, creating a fantastical visual experience where the wheels rotate while the cap remains stationary. The mobile emblem suspended above the hub adds a unique sporty aesthetic and technological texture to the vehicle.
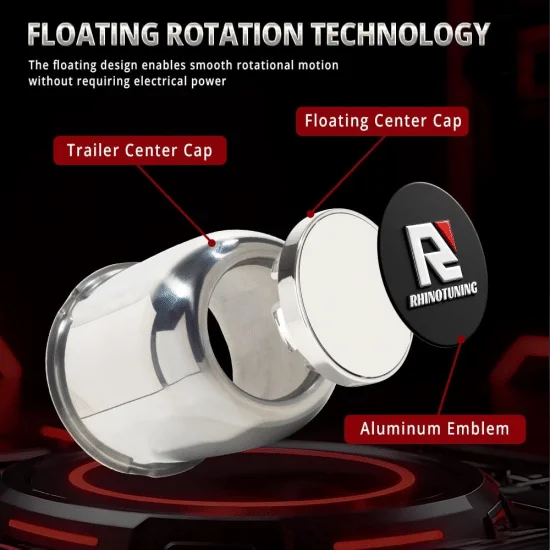
Please note: This floating push through center cap can only be used for modifying and upgrading this type of trailer wheel center caps with detachable plug.
2. Stick the RhinoTuning Emblem onto the top plate in the correct orientation.
Note: The three small circles on the front side are the bottom part of the emblem, and the emblem must be aligned with the middle small circle.
(A counterweight plate is attached to the back of the top plate. Driven by gravity, this counterweight plate will always stay at the bottom.
3. Insert the bearing plate at the bottom of the top plate.
4. Install the above assembled components onto the plug caps base
5. Use small cap to cover the bearing plate
6. Check whether the kit can rotate freely and automatically center itself as per the settings.
That’s the complete assembled guide to upgrading your trailer wheel center cap! With just a few simple assembly steps, you can add a sleek, dynamic touch to your wheels that’s sure to draw attention. Ready to level up your ride’s look? Grab your RhinoTuning floating push through center cap Kit today and enjoy the standout visual effect on every journey!
Back To Our Store

How is the floating push through center cap assembled?
The following text provides a detailed breakdown of the installation steps for each component, ensuring that the center cap is securely fastened without falling off, and enabling smooth rotation, thus perfectly presenting the visual effect of a floating suspension.Please note: This floating push through center cap can only be used for modifying and upgrading this type of trailer wheel center caps with detachable plug.
These are the parts that we need to use.
 |
 |
 |
 |
| 1. RhinoTuning Emblem | 2. Top Plate (include counterweight) | 3. Bearing Plate | 4. Plug Caps Base |
 |
| 5. Cover the bearing' small cap |
Assembly Steps:
1. Remove the original trailer wheel center cap plug2. Stick the RhinoTuning Emblem onto the top plate in the correct orientation.
Note: The three small circles on the front side are the bottom part of the emblem, and the emblem must be aligned with the middle small circle.
(A counterweight plate is attached to the back of the top plate. Driven by gravity, this counterweight plate will always stay at the bottom.
3. Insert the bearing plate at the bottom of the top plate.
4. Install the above assembled components onto the plug caps base
5. Use small cap to cover the bearing plate
6. Check whether the kit can rotate freely and automatically center itself as per the settings.
 |
 |
That’s the complete assembled guide to upgrading your trailer wheel center cap! With just a few simple assembly steps, you can add a sleek, dynamic touch to your wheels that’s sure to draw attention. Ready to level up your ride’s look? Grab your RhinoTuning floating push through center cap Kit today and enjoy the standout visual effect on every journey!
Leave a Reply
Your email address will not be published.Required fields are marked. *